Multiplayer (HATS) - Guide
[SMPL-HATS-02]
Steps
Follow these steps to get started:
These steps are already complete in the sample project. The instructions here explain the process.
Related FeaturesMore details are covered in related feature page(s).
• Matchmaking - Connect remote players in a room
• Multiplayer - Allow game makers to create multi-user experiences
Step 1. Setup Project
Here are instructions to setup the Beamable SDK and "GameType" content.
| Step | Detail |
|---|---|
| • See Step 1 - Getting Started for more info. |
| • Unity → Window → Beamable → Open Content Manager |
| 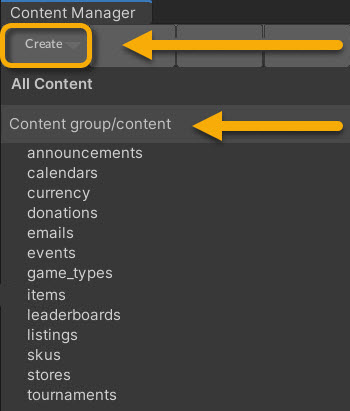 • Select the content type in the list • Press the "Create" button • Populate the content name |
| 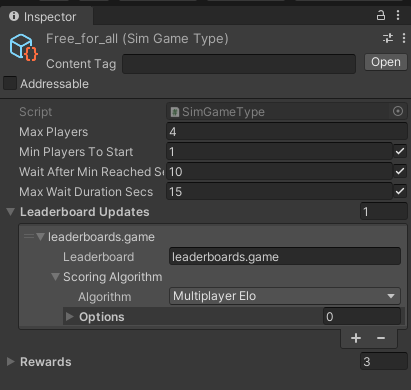 • Populate the Max Players field\ Note: The other fields are optional and may be needed for advanced use cases like Matchmaking.\ |
| • Unity → File → Save Project Best Practice: If you are working on a team, commit to version control in this step |
| • Press the "Publish" button in the Content Manager Window |
Step 2. Plan the Multiplayer Game Design
See Multiplayer (Plan the Multiplayer Game Design) for more info.
Step 3. Create the Game Code
This step includes the bulk of time and effort in the project.
| Step | Detail |
|---|---|
| • Implement game logic Note: This represents the bulk of the development effort. The details depend on the specifics of the game project. |
Step 4. Create the Multiplayer Code
In this section you will find some partial code snippets. Download the project to see the complete code.
| Step | Detail |
|---|---|
| • Create event objects Note: Its likely that game makers will add multiplayer functionalitythroughout development including during step #3. For sake of clarity, it is described here as a separate, final step #4. |
| • Unity → Edit → Play |
| • Can you beat the opponents? |
| • Unity → Edit → Stop |
Multiplayer Game Simulation
HATS uses a deterministic simulation networking model. All network messages (HatsGameMessage) are broadcast to every client and fed into a local per-client instance of GameSimulation. The simulation, in turn, locally generates a series of HatsGameEvent to be consumed by MonoBehaviours that manage graphics and audio per GameObjects,
SpawnEventHandler, for instance, instantiates a new player GameObject when receiving a PlayerSpawnEvent;
public override IEnumerator HandleSpawnEvent(PlayerSpawnEvent evt, Action callback)
{
	Debug.Log("Spawning player " + evt.Player.dbid);
	yield return null;
	var playerGob = Instantiate(playerPrefab, GameProcessor.BattleGridBehaviour.Grid.transform);
	playerGob.Setup(GameProcessor, evt.Player);
	var localPosition = GameProcessor.BattleGridBehaviour.Grid.CellToLocal(evt.Position);
	playerGob.transform.localPosition = localPosition;
	callback();
}
Local player input is captured and converted to network messages via PlayerMoveBuilder:
public void CommitMove()
{
	moveBuilderState = PlayerMoveBuilderState.COMMITTED;
	NetworkDriver.DeclareLocalPlayerAction(new HatsPlayerMove
	{
		Dbid = PlayerDbid,
		TurnNumber = GameProcessor.Simulation.CurrentTurn,
		Direction = MoveDirection,
		MoveType = MoveType
	});
}
Keep in mind thatall messages are broadcast to every client, including the one that sent the message in the first place.
The GameProcessor spins up the game simulation (GameSimulation) and the network layer (MultiplayerGameDriver), connecting both with each other:
public void StartGame(List<long> dbids, BotProfileContent botProfileContent)
{
	var messageQueue = MultiplayerGameDriver.Init(roomId, framesPerSecond, new List<long>());

	var players = dbids.Select(dbid => new HatsPlayer
	{
		dbid = dbid
	}).ToList();

	Simulation = new GameSimulation(BattleGridBehaviour.BattleGrid, framesPerSecond, _configuration, players, botProfileContent, roomId.GetHashCode(), messageQueue);
	BattleGridBehaviour.SetupInitialTileChanges();
	StartCoroutine(PlayGame());
}
It continuously relays game events to local handlers:
foreach (var evt in Simulation.PlayGame())
{
	currentTurn = Simulation.CurrentTurn;
	if (evt == null)
	{
		yield return null;
		continue;
	}

	switch (evt)
	{
		case PlayerSpawnEvent spawnEvt:
			yield return EventHandlers.Handle(this, spawnEvt, handler => handler.HandleSpawnEvent);
			break;
		case PlayerMoveEvent moveEvt:
			yield return EventHandlers.Handle(this, moveEvt, handler => handler.HandleMoveEvent);
			break;
...
Leaderboard
Related GuidesA common use case for the feature is covered in the guides. It is recommended to read the guide before continuing with the sample steps below.
• Leaderboards - Display and update per-game leaderboards
Leaderboard-related functionality is handled via LeaderboardScreenController. It retrieves the current leaderboard in one essential call to Beamable's leaderboard SDK:
view = await beamable.LeaderboardService.GetBoard(LeaderboardRef, 0, 50, focus: beamable.User.id);In GameOverController, the winning player updates the leaderboard when receiving a GameOverEvent:
if (isWinner)
	_beamableAPI.LeaderboardService.IncrementScore(_leaderboardRef.Id, 1);
Inventory
Related GuidesA common use case for the feature is covered in the guides. It is recommended to read the guide before continuing with the sample steps below.
• Inventory - Define player inventory and offer items in a store
HATS offers players to buy characters and hats, both being purely decorative items without any effect on gameplay. Players need to earn Gems to buy these items. All items are subtypes of Beamable's ItemContent and are managed by the Beamable Content Manager. Transactions and available shop listings are handled by CharacterPanelController, going hand in hand with PlayerInventory:
public async Task PopulateCharacterShop()
{
	var beamable = await Beamable.API.Instance;
	var shop = await beamable.CommerceService.GetCurrent(CharacterShopRef.Id);
	var playerCharacters = await PlayerInventory.GetAvailableCharacters();
	foreach (var listing in shop.listings)
	{
...
		var itemContentId = listing.offer.obtainItems[0].contentId;
		var hasCharacterAlready = playerCharacters.Any(character => character.Id.Equals(itemContentId));
		if (hasCharacterAlready) continue; // skip this listing because the player already owns the take
...
public static async Task<List<CharacterContent>> GetAvailableCharacters()
{
var beamable = await Beamable.API.Instance;
var characters = await beamable.InventoryService.GetItems<CharacterContent>();
...Additional Experiments
Here are some optional experiments game makers can complete in the sample project.
Did you complete all the experiments with success? We'd love to hear about it. Contact us.
| Difficulty | Scene | Name | Detail |
|---|---|---|---|
| Beginner | Give yourself gems without winning even a single game | Hint: There is one defaultCurrency type | |
| Beginner | All Scenes | Change game asset to create a new theme (SciFi, Fantasy, ...) | • Replace (or add) all visible textures and sprites in UI and the game itself • If you add assets, update all image references accordingly |
| Intermediate | All Scenes | Add more characters, hats or tile types | • Find the birthday hat and offer a normal and a drunk version Hint: All of that requiresContent changes |
| Intermediate | Scene02Game | Make a surrendered player carry a white flag | • A player can be dead in two ways now • Adapt the way that players are rendered accordingly |
| Advanced | Scene02Game | Add arrow frenzy | • Add a powerup that shoots arrows in all directions at once. It should only last one turn. • Little Twist: Shoot arrows sequentially, in clockwise order |
| Advanced | All Scenes | Make the game 3D | • For starters, leave GameSimulation alone and work your way through BattleGrid first |
Advanced
This section contains any advanced configuration options and workflows.
Matchmaking
In multiplayer gaming, matchmaking is the process of choosing a room based on criteria (e.g. "Give me a room to play in with 2 total players of any skill level"). Beamable supports matchmaking through its matchmaking service.
See Matchmaking for more info.
For HATS, a single catch-all GameType is used, allowing the player to play against up to three bots or other human contenders, waiting 10 seconds until the match starts.

MatchmakingBehaviour handles all Matchmaking-related functionality. As soon as a match is found, the 'Scene02Game' scene is loaded:
...
MatchmakingHandle = await _api.Experimental.MatchmakingService.StartMatchmaking(
	GameTypeRef.Id,
	maxWait: TimeSpan.FromSeconds(_configuration.OverrideMaxMatchmakingTimeout),
	updateHandler: handle =>
	{
		// No updates available at the moment when searching a match.
	},
	readyHandler: handle =>
	{
		Debug.Assert(handle.State == MatchmakingState.Ready);

		var dbids = MatchmakingHandle.Status.Players;
		var gameId = MatchmakingHandle.Status.GameId;
		var matchId = handle.Match.matchId;

		Debug.Log($"Match is ready! Found matchID={matchId} gameId={gameId}");
		Debug.Log($"Starting match with DBIDs={string.Join(",", dbids.ToArray())}");

		List<long> dbidsAsLong = dbids.Select(i => long.Parse(i)).ToList();
		HatsScenes.LoadGameScene(gameId, dbidsAsLong);
	},
	timeoutHandler: handle =>
	{
		Debug.Log($"Matchmaking timed out! state={handle.State}");
		IsSearching = false;
		OnTimedOut?.Invoke();
	}
);
...
Game Security
See Multiplayer (Game Security) for more info.
Playing "Against Yourself"
See Multiplayer (Playing Against Yourself) for more info.
Randomization and Determinism
See Multiplayer (Randomization and Determinism) for more info.
Learning Resources
These learning resources provide a better way to build live games in Unity.
| Source | Detail |
|---|---|
 |
|
Updated 8 months ago