Microservices (BBB) - Guide
[SMPL-BBB-02]
This document and the sample project allow game makers to understand and apply the benefits of Microservices in game development. Or watch this video.
Download
These learning resources provide a better way to build live games in Unity.
| Source | Detail |
|---|---|
 |
|
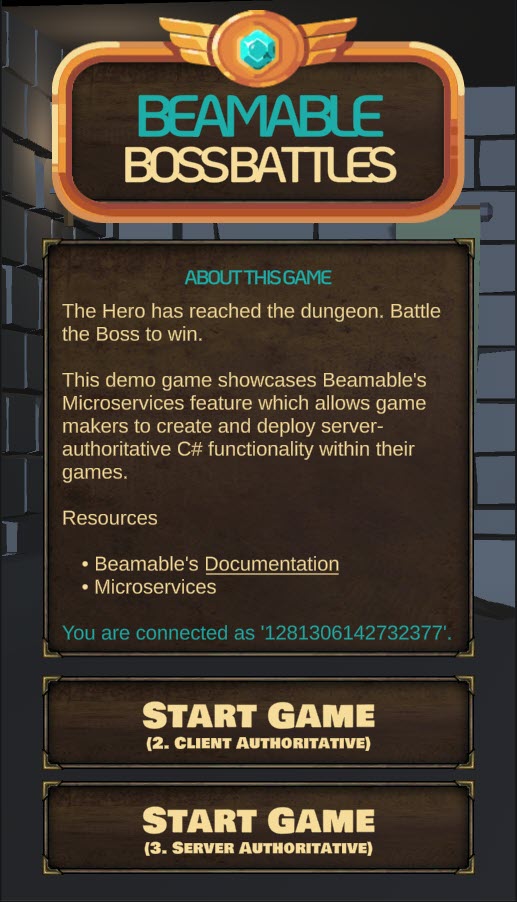
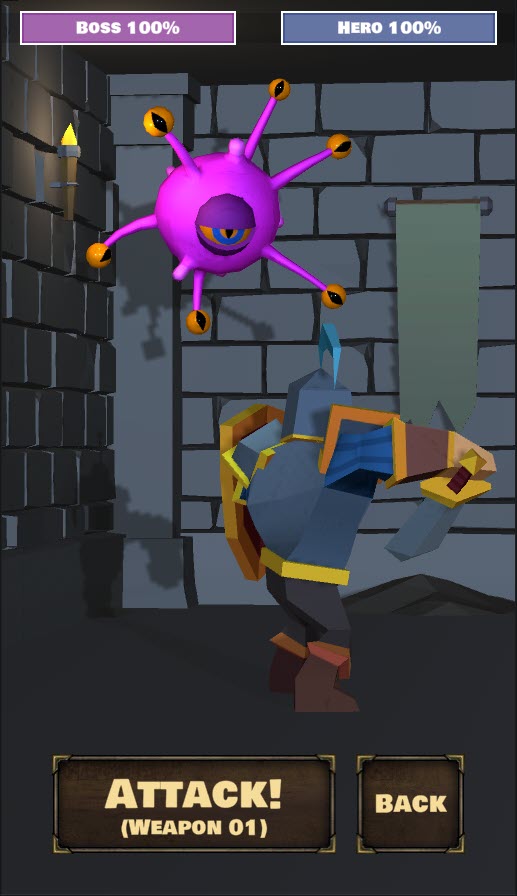
Screenshots
The player navigates from the Intro Scene to the Game Scene, where all the action takes place.
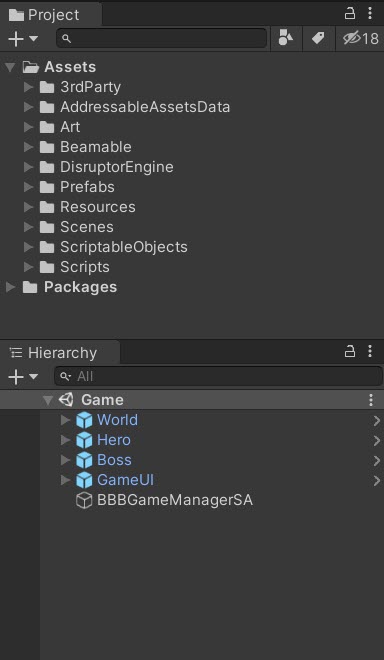
| Intro Scene | Game Scene | Project |
|---|---|---|
 |  |  |
Player Experience Flowchart
Here is the high level execution flow of user input and system interactions.
The player battles the boss and the workload is appropriately divided between the C# game client code and the C# Beamable Microservice code. Goals of using server-authoritative programming include to increase the game's security (against any malicious hackers in the game's community) and to improve live ops workflows.
- StartTheBattle () - Public Microservice method to reset the
BossHealthStat and randomizeHeroWeaponIndexStat - AttackTheBoss () - Public Microservice method to reduce the
BossHealthStat based onWeaponContent
Game Maker User Experience
During development, the game maker's user experience is as follows: There are 3 major parts to this game creation process.
Steps
Follow these steps to get started:
Related FeaturesMore details are covered in related feature page(s).
• Microservices - Create and deploy your own code which we host
Step 1. Setup Beamable Content
This is a general overview of Beamable's Content flow. For more detailed instructions, see the Content Manager doc.
| Step | Detail |
|---|---|
| • See Getting Started With Beamable Microservices |
| [ContentType("weapon")]public class Weapon : ContentObject{public float HitChance = 0.5f;public int MinDamage = 25;public int MaxDamage = 50;} |
| 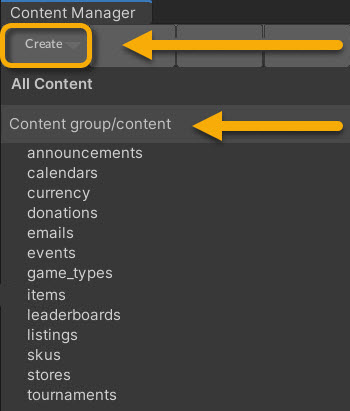 • Select the content type in the list • Select the content type in the list• Press the "Create" button • Populate the content name |
| 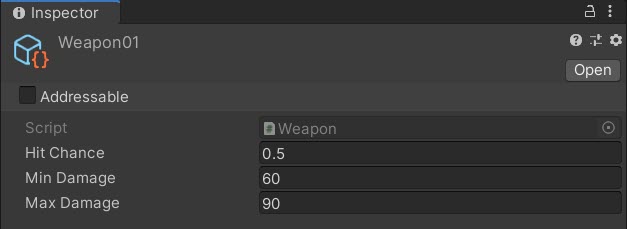 |
| [ContentType("boss")]public class Boss : ContentObject{public int MaxHealth = 100;} |
| • Select the content type in the list • Press the "Create" button • Populate the content name |
| 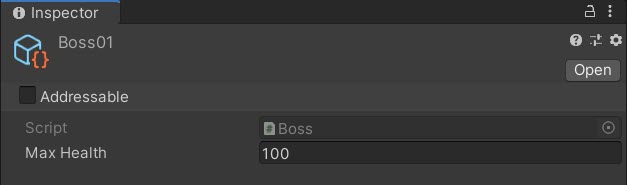 |
| • Unity → File → Save Project Best Practice: If you are working on a team, commit to version control in this step. |
| • Press the "Publish" button in the Content Manager Window. See Content Manager for more info. |
Step 2. Create Game Client Code
This step includes the bulk of time and effort the project.
| Step | Detail |
|---|---|
| 1. Create C# Client Code (Basics) | • The details vary wildly depending on the needs of the project's game design. |
| 2. Create C# Client Code (To Call Microservices) | • See BBBGameManagerSA.cs below. |
Inspector
Here is the BBBGameManagerSA.cs main entry point for the Game Scene interactivity. The "SA" in the class name indicates server-authoritative.

The "Content" references are easily configurable
Here is the Configuration.cs holding high-level, easily-configurable values used by various areas on the game code.
GotchasHere are hints to help explain some of the trickier concepts:
• While the name is similar, this
Configuration.csis wholly unrelated to Beamable's Configuration Manager.

The "Configuration" values are easily configurable
Optional: Game Makers may experiment with newDelay values in the Attack section and allow the player's turn to occur faster or slower.
Code
namespace Beamable.Samples.BBB
{
   public class BBBGameManagerSA : MonoBehaviour
   {
      //  Fields ---------------------------------------

      [SerializeField]
      private GameUI _gameUI = null;

      [SerializeField]
      private HeroView _heroView = null;

      [SerializeField]
      private BossView _bossView = null;

      [SerializeField]
      private PointsView _pointsViewPrefab = null;

      [SerializeField]
      private Configuration _configuration = null;

      [Header("Content")]
      [SerializeField]
      private BossContentRef _bossContentRef = null;

      [SerializeField]
      private List<WeaponContentRef> _weaponContentRefs = null;

      private PointsView _pointsViewInstance = null;
      private BBBGameMicroserviceClient _bbbGameMicroserviceClient = null;

      //  Unity Methods   ------------------------------
      protected void Start()
      {
         _gameUI.AttackButton.onClick.AddListener(AttackButton_OnClicked);

         // Block user interaction
         _gameUI.CanvasGroup.DOFade(0, 0);
         _gameUI.AttackButton.interactable = false;

         _bbbGameMicroserviceClient = new BBBGameMicroserviceClient();
         StartTheBattle();

      }

      //  Other Methods --------------------------------
      private void StartTheBattle ()
      {
         int heroWeaponIndexMax = _weaponContentRefs.Count;

         // ----------------------------
         // Call Microservice Method #1
         // ----------------------------
         _bbbGameMicroserviceClient.StartTheBattle(_bossContentRef, heroWeaponIndexMax)
            .Then((StartTheBattleResults results) =>
            {
               _gameUI.BossHealthBarView.Health = results.BossHealthRemaining;
               _gameUI.AttackButtonText.text = BBBHelper.GetAttackButtonText(results.HeroWeaponIndex);

               // Find the Weapon data from the Weapon content
               _weaponContentRefs[results.HeroWeaponIndex].Resolve()
                  .Then(content =>
                  {
                     //TODO; Fix fade in of models (Both scenes)
                     BBBHelper.RenderersDoFade(_bossView.Renderers, 0, 1, 0, 3);
                     BBBHelper.RenderersDoFade(_heroView.Renderers, 0, 1, 1, 3);

                     // Allow user interaction
                     _gameUI.AttackButton.interactable = true;
                     _gameUI.CanvasGroup.DOFade(1, 1).SetDelay(0.50f);

                  })
                  .Error((Exception exception) =>
                  {
                     System.Console.WriteLine("_bossContentRef.Resove() error: " + exception.Message);
                  });

            })
            .Error((Exception exception) =>
            {
               UnityEngine.Debug.Log($"StartTheBattle() error:{exception.Message}");
            });
      }


      private IEnumerator Attack()
      {
         _gameUI.AttackButton.interactable = false;

         // Wait - Click
         yield return new WaitForSeconds(_configuration.Delay1BeforeAttack);
         SoundManager.Instance.PlayAudioClip(SoundConstants.Click02);

         // Wait - Backswing
         yield return new WaitForSeconds(_configuration.Delay2BeforeBackswing);
         SoundManager.Instance.PlayAudioClip(SoundConstants.Unsheath01);
         _heroView.PrepareAttack();

         bool isDone = false;

         // ----------------------------
         // Call Microservice Method #2
         // ----------------------------
         AttackTheBossResults attackTheBossResults = null;
         _bbbGameMicroserviceClient.AttackTheBoss(_weaponContentRefs)
            .Then((AttackTheBossResults results) =>
            {
               isDone = true;
               attackTheBossResults = results;

            })
               .Error((Exception exception) =>
            {
               UnityEngine.Debug.Log($"AttackTheBoss() error:{exception.Message}");
            });

         while (!isDone)
         {
            yield return new WaitForEndOfFrame();
         }

         // Wait - Swing
         yield return new WaitForSeconds(_configuration.Delay3BeforeForeswing);
         SoundManager.Instance.PlayAudioClip(SoundConstants.Swing01);
         _heroView.Attack();

         // Show floating text, "-35" or "Missed!"
         if (_pointsViewInstance != null)
         {
            Destroy(_pointsViewInstance.gameObject);
         }
         _pointsViewInstance = Instantiate<PointsView>(_pointsViewPrefab);
         _pointsViewInstance.transform.position = _bossView.PointsViewTarget.transform.position;

         // Evaluate damage
         if (attackTheBossResults.DamageAmount > 0)
         {
            // Wait - Damage
            yield return new WaitForSeconds(_configuration.Delay4BeforeTakeDamage);
            SoundManager.Instance.PlayAudioClip(SoundConstants.TakeDamage01);
            BBBHelper.RenderersDoColorFlicker(_bossView.Renderers, Color.red, 0.1f);
            _bossView.TakeDamage();

            // Wait - Points
            yield return new WaitForSeconds(_configuration.Delay5BeforePointsView);
            SoundManager.Instance.PlayAudioClip(SoundConstants.Coin01);

            _pointsViewInstance.Points = -attackTheBossResults.DamageAmount;

         }
         else
         {
            // Wait - Points
            yield return new WaitForSeconds(_configuration.Delay5BeforePointsView);
            SoundManager.Instance.PlayAudioClip(SoundConstants.Coin01);

            _pointsViewInstance.Text = BBBHelper.GetAttackMissedText();
         }

         if (attackTheBossResults.BossHealthRemaining <= 0)
         {
            _bossView.Die();
            SoundManager.Instance.PlayAudioClip(SoundConstants.GameOverWin);
         }
         else
         {
            _gameUI.AttackButton.interactable = true;
         }

         _gameUI.BossHealthBarView.Health = attackTheBossResults.BossHealthRemaining;
      }

      //  Event Handlers -------------------------------
      public void AttackButton_OnClicked ()
      {
         StartCoroutine(Attack());
      }
   }
}
Alternative API
Beamable Microservices supports a Promise-based workflow. The availability of the result of the Promise may be handled using .Then() within synchronous scopes as shown above or handled with .IsCompleted within Coroutines as shown here.
Game makers may choose either syntax.
// ----------------------------
// Call Microservice Method #2
// ----------------------------
AttackTheBossResults attackTheBossResults = null;
_bbbGameMicroserviceClient.AttackTheBoss(_weaponContentRefs)
   .Then((AttackTheBossResults results) =>
   {
      isDone = true;
      attackTheBossResults = results;

   })
      .Error((Exception exception) =>
   {
      UnityEngine.Debug.Log($"AttackTheBoss() error:{exception.Message}");
   });

while (!isDone)
{
   yield return new WaitForEndOfFrame();
}
Step 3. Create Game Server Code (Microservices)
Create the Microservice and the project-specific C# code to meet the game's needs.
| Name | Detail |
|---|---|
| 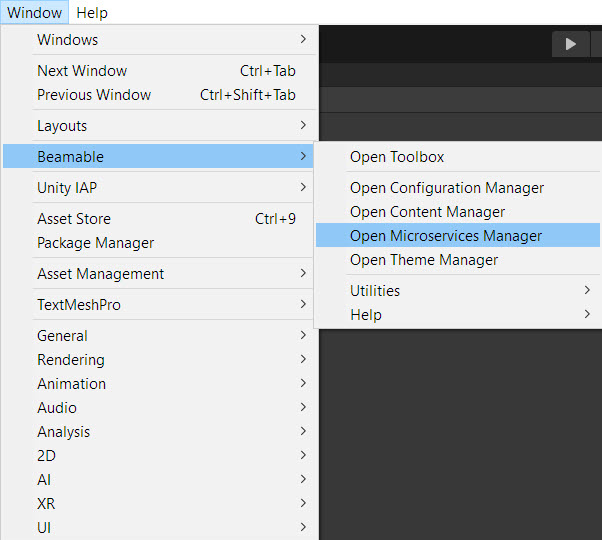 • Unity → Window → Beamable → Open Microservices Manager • Unity → Window → Beamable → Open Microservices Manager |
| • Unity → Window → Beamable → Create New Microservice • Populate all form fields |
| See the BBBGameMicroservice.cs code snippet below the table |
| 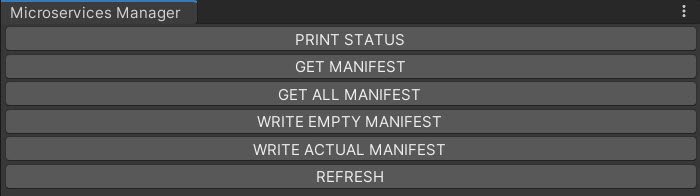 • See Beamable Microservice Manager Window • See Beamable Microservice Manager Window |
| • See Beamable Microservice Manager Window |
| • Unity → Edit → Play Note: Verify that the code properly functions. This varies depending on the specifics of the game logic |
| • Unity → Edit → Stop |
API
Read these method diagrams along with the following code snippet for a full understanding of the client-server data exchange.
Call Microservice Method #1
The Boss data is passed along via ContentRef to set the initial BossHealth Stat value (e.g. 100). The heroWeaponIndexMax (e.g. 2) is passed and used as a random value is rolled (e.g. 1) for which weapon the Hero will use for the duration of the battle. This is stored in the `HeroWeaponIndex' Stat for subsequent use.
Note: The use of randomization for the`HeroWeaponIndex' is a simplified solution fit for this sample project. However, its likely a production game would feature deeper game play and allow the player to select the Hero's weapon, instead of using a random.
Call Microservice Method #2
A list of Weapon data is passed along via ContentRef. The Microservice uses only one index in the list (via HeroWeaponIndex Stat), calculates the damage done to the Boss and returns data to the client used for rendering of animations and UI text.
Code
Here is the code for the steps above.
Beamable auto-generates this original version of the BBBGameMicroservice as the starting point.
using Beamable.Server;

namespace Beamable.Server.BBBGameMicroservice
{
   [Microservice("BBBGameMicroservice")]
   public class BBBGameMicroservice : Microservice
   {
      [ClientCallable]
      public void ServerCall()
      {
         // This code executes on the server.
      }
   }
}
The game maker updates the code to meet the needs of the game project.
Here is final version of the BBBGameMicroservice.
namespace Beamable.Server.BBBGameMicroservice
{
   [Microservice("BBBGameMicroservice")]
   public class BBBGameMicroservice : Microservice
   {
      [ClientCallable]
      public async Task<StartTheBattleResults> StartTheBattle(BossContentRef bossContentRef, int heroWeaponIndexMax)
      {
         // Find the Boss data from the Boss content
         var boss = await bossContentRef.Resolve();

         // Set boss health to 100
         await BBBHelper.SetProtectedPlayerStat(Services, Context.UserId,
                BBBConstants.StatKeyBossHealth,
                boss.MaxHealth.ToString());

         // Set hero weapon index to random (0,1)
         int heroWeaponIndex = new System.Random().Next(heroWeaponIndexMax);

         await BBBHelper.SetProtectedPlayerStat(Services, Context.UserId,
                BBBConstants.StatKeyHeroWeaponIndex,
                heroWeaponIndex.ToString());

         return new StartTheBattleResults
         {
            BossHealthRemaining = boss.MaxHealth,
            HeroWeaponIndex = heroWeaponIndex
         };
      }

      [ClientCallable]
      public async Task<AttackTheBossResults> AttackTheBoss(List<WeaponContentRef> weaponContentRefs)
      {
         // Get the weapon index
         string heroWeaponIndexString = await BBBHelper.GetProtectedPlayerStat(Services, Context.UserId,
            BBBConstants.StatKeyHeroWeaponIndex);

         // Get the weapon
         int heroWeaponIndex = int.Parse(heroWeaponIndexString);

         // Find the weapon data from the Weapon content
         var weapon = await weaponContentRefs[heroWeaponIndex].Resolve();

         // Calculate the damage
         Random random = new Random();
         int damageAmount = 0;
         double hitRandom = random.NextDouble();

         //Console.WriteLine($"weaponData.hitChance={weapon.HitChance}.");
         //Console.WriteLine($"hitRandom={hitRandom}.");

         if (hitRandom <= weapon.HitChance)
         {
            damageAmount = random.Next(weapon.MinDamage, weapon.MaxDamage);
            //Console.WriteLine($"weapon.MinDamage={weaponData.MinDamage}.");
            //Console.WriteLine($"weapon.MaxDamage={weaponData.MaxDamage}.");
         }

         //Console.WriteLine($"damageAmount={damageAmount}.");

         // Return the damage
         return await DamageTheBoss(damageAmount);
      }

      public async Task<AttackTheBossResults> DamageTheBoss(int damageAmount)
      {
         // Get the health
         string bossHealthRemainingString = await BBBHelper.GetProtectedPlayerStat(Services, Context.UserId,
            BBBConstants.StatKeyBossHealth);

         int bossHealthRemaining = int.Parse(bossHealthRemainingString);

         // Decrement the health
         bossHealthRemaining = Math.Max(0, bossHealthRemaining - damageAmount);

         // Set the health
         await BBBHelper.SetProtectedPlayerStat(Services, Context.UserId,
             BBBConstants.StatKeyBossHealth,
             bossHealthRemaining.ToString());

         // Return the health
         return new AttackTheBossResults {
           DamageAmount = damageAmount,
           BossHealthRemaining = bossHealthRemaining
         };
      }
   }

   //TODO: Propose to add this to Beamable SDK API
   public static class BBBHelper
   {
      public static async Task<EmptyResponse> SetProtectedPlayerStat(IBeamableServices services, long userId, string key, string value)
      {
         return await services.Stats.SetProtectedPlayerStat(userId, key, value)
           .Error ((Exception exception) =>
            {
               BeamableLogger.Log($"SetProtectedPlayerStat() error={exception.Message}.");
            });
      }

      public static async Task<string> GetProtectedPlayerStat(IBeamableServices services, long userId, string key)
      {
         var stat = await services.Stats.GetProtectedPlayerStat(userId, key);

         if (!string.IsNullOrEmpty (stat))
         {
            return stat;
         }
         else
         {
            throw new System.Exception("GetProtectedPlayerStat() error.");
         }
      }
   }

   public static class BBBConstants
   {
      public const string StatKeyBossHealth = "BossHealth";
      public const string StatKeyHeroWeaponIndex = "HeroWeaponIndex";
   }

   public class AttackTheBossResults
   {
      public int DamageAmount;
      public int BossHealthRemaining;
   }

   public class StartTheBattleResults
   {
      public int BossHealthRemaining;
      public int HeroWeaponIndex;
   }
}
Congratulations! With the Beamable content setup, the client code created, and the server code finished, the game is ready.
Verify Success
As an optional step, verify that everything is properly setup. Display the current player’s PlayerId on-screen and in the Unity Console Window.
| Step | Detail |
|---|---|
| 1. Play the Intro Scene | • Unity → Edit→ Play |
| 2. Click the "Start Game" button | Note: The game is playable with or without the client services. This helps game makers to study the differences in implementation |
| 3. Click the "Attack" button | Note: Repeat until theBossHealth reaches zero to win |
| 4. Stop the Intro Scene | • Unity → Edit→ Stop |
Additional Experiments
Here are some optional experiments game makers can complete in the sample project.
Did you complete all the experiments with success? We'd love to hear about it. Contact us.
| Difficulty | Scene | Name | Detail |
|---|---|---|---|
| Beginner | Game | Add More Hero Weapons | • The current game randomizes between weapons. Add more weapons (Weapons are non-visual)
|
| Beginner | Game | Hide the Microservice Latency | • The current game A) animates the Hero's backward swing, B) calls the Microservice, C) waits for Microservice D) animates the Hero's forward swing
|
| Intermediate | Intro | Add Hero Weapon Selector | • The current game randomizes between weapons. Allow player to choose instead
|
| Advanced | Game | Add Boss Attacks Hero | • The current UI displays the Hero's health (always 100%). Allow the Boss to attack the Hero
|
Advanced
This section contains any advanced configuration options and workflows.
What about latency?
As with any asynchronous client-server setup, each Beamable Microservice method call will incur some latency. In rare cases, the method call will time-out (e.g. after 10 seconds) or error out.
Design the game-client to account for latency (e.g. temporarily disable UI buttons) and to handle errors (e.g. display a UI dialog box).
What is the Beamable Microservice development cycle?
This is a work-in-progress. At this stage of maturity, the process is as follows.
Editing Non-Microservice code
- Save your C# script(s)
- Click to focus the Unity Editor Window
- Wait Unity to recompile
- Play the Scene
- Enjoy the game
- Stop the Scene
Editing Microservice code
- Save your C# script(s)
- Click to focus the Unity Editor Window
- Wait for Unity to recompile
- Stop the Server (Unity Microservice Manager Window)
- Build the Server
- Start the Server
- Play the Scene
- Enjoy the game
- Stop the Scene
Learning Resources
These learning resources provide a better way to build live games in Unity.
| Source | Detail |
|---|---|
|
|
Updated 8 months ago