Events - Guide
Allow game maker to set up a one-time competition [LIVE-Events-02]
Events, like many other Beamable features, are created, configured and published via the Content Manager. This guide is intended to show you how to create an event, configure its required (or optional) data, and publish it to your users.
Steps
Follow these steps to get started:
| Step | Detail |
|---|---|
| • Unity → Window → Beamable → Open Beamable Toolbox |
| • Unity → Window → Beamable → Open Content Manager |
| 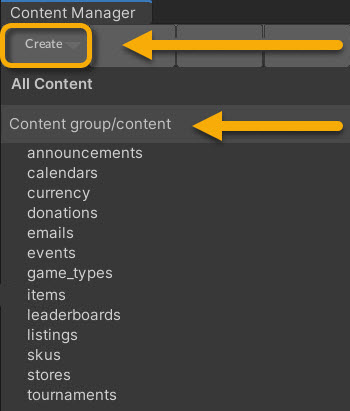 • Select the content type in the list • Select the content type in the list• Press the "Create" button • Populate the content name |
| • Click the asset in the Content Manager Window • View the asset in the Unity Inspector Window |
| 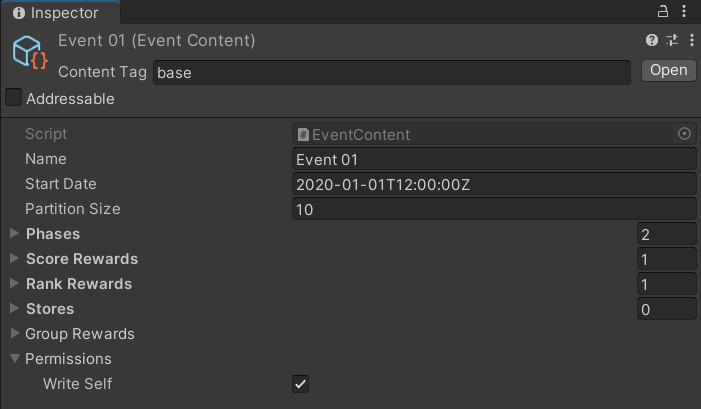 Note: The few fields shown are the minimum requirement. SeeAdvanced for more info. Note: The few fields shown are the minimum requirement. SeeAdvanced for more info. |
| • Unity → File → Save Project Best Practice: If you are working on a team, commit to version control in this step. |
| • Press the "Publish" button in the Content Manager Window |
At this point, your event has been created and has been published live to players. To see how players can interact with the event, see the Code section. Below are some more advanced topics, covering optional parameters for the events in your app.
Advanced
In this image and tables are example name/value pairs to demonstrate how to populate the Event content object. The actual name and values used depend on the specific needs of the game project.

Adding Rules
Event rules are optional and are not parsed by the client side. However, they are powerful tool to use to create and maintain server-authoritative logic.
| Name | Value | Detail |
|---|---|---|
| "collect_gems" | 10 | Create custom client logic to parse the name and value. Require that players meet this rule. Example: Limit which players may enter the Event or limit which players may claim rewards |
| "idle_content" | < some content id > | Create custom client logic to parse the name and value. Require that players meet this rule. Example: Limit which players may enter the Event or limit which players may claim rewards |
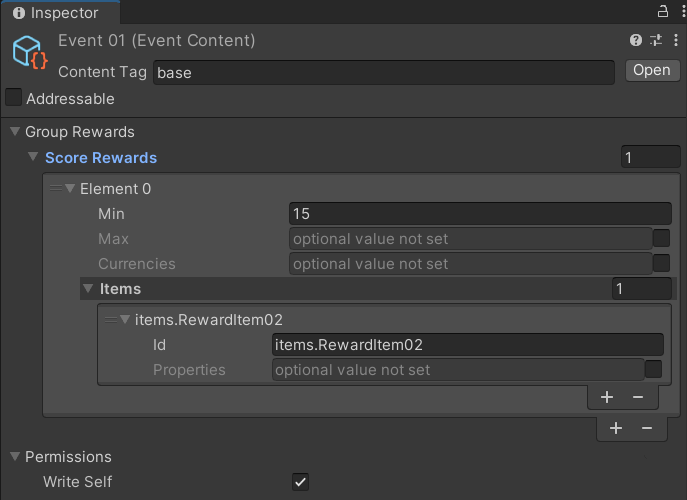
Adding Rewards
Event rewards are optional but they are a fundamental part of marketing the live Event. Rewards encourage player participation.
The criteria for a reward may be either a certain score or a certain score rank.
The reward give to the player may be of currency type, of item type, or both.
| Name | Example Value | Example Result |
|---|---|---|
| "currency.Currency01" | 10 | Each player who meets the criteria will earn 10 gems. |
| "items.BronzeArmor" | 1 | Each player who meets the criteria will earn 1 Bronze Armor inventory item. |
Adding Stores
Event stores are optional but they are a fundamental part of monetizing a live event. Game makers can make a limited-time offer within in-game stores to encourage player purchase behavior. This creates effective monetization because there is an urgency and sense of purpose to the related purchases.
Refer to the table below for an example of a limited store, where event-driven offers will be kept.
| Name | Value | Detail |
|---|---|---|
| "Store Id" | stores.LimitedStore01 | Each player in the Event will see a special "LimitedStore" version of the in-game store. Game makers can offer new items or can offer existing items at an exclusive price. |
Adding Group Rewards
Typically, the event rewards (for the standard events described above) are based on the player's individual progress (score, rank, etc.) in the game and the reward is given to that individual.
However, with group events, rewards are based on group progress (e.g., combined score of every group member). When a group event is rewarded, all eligible members of the group receive the reward — regardless of individual contribution to the event.
GotchasHere are hints to help explain some of the trickier concepts:
• To be eligible for a group reward, the player must join the group before the event begins. Or the player must be the creator of the group
See Groups for more information about creating and joining a group.
Updated 8 months ago